
itchat的项目简介:
https://itchat.readthedocs.io/zh/latest/
itchat是开源的微信个人号接口,可以在py2.7和py3.5的版本环境下运用
py的安装和环境搭建 自行百度哈
要想曝光前必须得安装itchat:
通过以下命令安装itchat:
pip install itchat
然后就是打开我们的IDE工具PyCharm(我个人用得比较多的是这款,其他的也行),创建一个名为acuire.py的文件
以下是该文件的代码1
2
3
4
5
6
7
8
9
10
11
12
13
14
15
16
17
18
19
20
21
22
23
24
25
26
27
28
29
30
31
32
33
34
35
36
37
38
39
40
41
42
43
44
45
46
47# -*- coding:utf-8 -*-
#author:云亦然
#需自行安装itchat(pip install itchat)
#导入itchat模块,在网页版上操作微信账号的接口
import itchat
#获取微信的数据
def acquire_data():
#扫描二维码,登录微信
itchat.auto_login()
#获取所有好友信息
friends = itchat.get_friends(update=True) #返回用户信息字典
return friends
#处理微信的数据
def parse_data(data):
friends = []
for item in data[1:]: #第一个元素是自己排除掉
friend = {
'UserName':item['UserName'],#微信系统内的用户编码标识
'DisplayName':item['DisplayName'],#好友微信名
'NickName':item['NickName'],#好友昵称
'HeadImgUrl':item['HeadImgUrl'],#微信系统内的头像URL
'RemarkName':item['RemarkName'],#好友备注名
'Sex':item['Sex'],#性别 1为男2为女0未设置
'Province':item['Province'],#省份
'City':item['City'],#城市
'Alias':item['Alias'],#微信号
'Signature':item['Signature'].replace('\n','').replace(',',''),#个性签名(replace替换掉内容换行和逗号)
'StarFriend':item['StarFriend'],#星标好友:1是0否
'ContactFlag':item['ContactFlag'],#好友类型权限::1和3好友,259和33027不让他看我的朋友圈,65539不看他的朋友圈,65795两项设置全禁止
}
friends.append(friend)
return friends
#存储数据,存储到txt文件上
def save_data():
friends = parse_data(acquire_data())#把返回的字典用处理函数处理
for item in friends:
with open('WeChat_friends.txt',mode='a',encoding='utf-8') as b:
b.write('%s,%s,%s,%s,%s,%d,%s,%s,%s,%s,%d,%d\n' %(item['UserName'],item['DisplayName'],item['NickName'],
item['HeadImgUrl'],item['RemarkName'],item['Sex'],
item['Province'],item['City'],item['Alias'],item['Signature'],
item['StarFriend'],item['ContactFlag']))
if __name__ == '__main__':
save_data()
保存好代码之后 就可以在命令行输入:python acquire.py 静候 出现一个二维码扫描登录 登录完成后 该文件下的目录就会生成一个WeChat_friends.txt的文件了。这文件里面就是我们微信好友全部的信息了
接下来就是对保存的数据进行分析了
我们继续创建一个analyze.py文件
在这之前,需要安装pyecharts,命令行输入:pip install pyecharts
文件的代码如下
1 | # -*- coding:utf-8 -*- |
在运行python analyze.py时 有可能会出现No module named ‘pyechars_snapshot’的错误
解决方法是:
https://pypi.org/project/pyecharts-snapshot/#files
下载此文件后,在目录下打开cmd使用命令 pip install pyecharts_snapshot-0.1.8-py2.py3-none-any.whl 安装完成即可
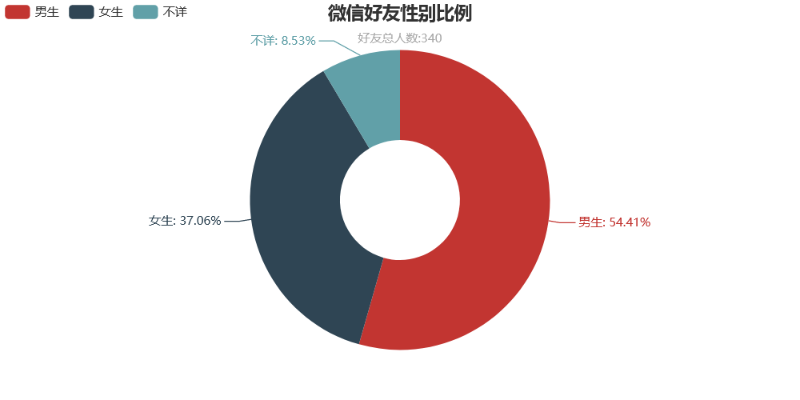
然后你就会发现目录下生成了一个好友性别分析.html的文件
打开就是如图所示了:
更多的小伙伴对这个图是很感应趣
:
是怎么做出来的呢 他可以是个性签名云图也可以是备注名云图
创建cloud_img.py文件,代码如下1
2
3
4
5
6
7
8
9
10
11
12
13
14
15
16
17
18
19
20
21
22
23
24
25
26
27
28
29
30
31
32
33
34
35
36
37
38
39
40
41
42
43
44
45
46
47
48
49
50
51
52
53
54
55
56
57
58
59
60
61
62
63
64
65
66
67
68
69
70
71
72
73
74
75
76
77# -*- coding:utf-8 -*-
#author:云亦然
#个性签名云图
#需自行安装jieba(pip install jieba)
#需自行安装matplotlib(pip install matplotlib)
#需自行安装wordcloud(pip install wordcloud)
import jieba
import matplotlib.pyplot as plt
from wordcloud import WordCloud,STOPWORDS
#获取个性签名
signatures = []
with open('WeChat_friends.txt',mode='r',encoding='utf-8') as b:
rows = b.readlines()
for row in rows:
signature = row.split(',')[9]
if signature != '':
signatures.append(signature)
# 获取备注名
remarkNames = []
with open('WeChat_friends.txt', mode='r', encoding='utf-8') as b:
rows = b.readlines()
for row in rows:
remarkName = row.split(',')[4]
remarkName.replace('a.', 'span')
if remarkName != '':
remarkNames.append(remarkName)
#设置分词
split = jieba.cut_for_search(str(signatures))#搜索引擎模式,还有False精准模式分词,True全模式分词
split1 = jieba.cut_for_search(str(remarkNames))
words = ' '.join(split)#以空格进行拼接
words1 = ' '.join(split1)
#print(words)
#设置屏蔽词,去掉表情和特殊符号等
#图片生成的一些无法显示的表情都可以自行添加屏蔽
stopwords = STOPWORDS.copy()
stopwords.add('span')
stopwords.add('class')
stopwords.add('emoji')
stopwords.add('emoji1f334')
stopwords.add('emoji1f388')
stopwords.add('emoji1f338')
stopwords.add('emoji1f33a')
stopwords.add('emoji1f33c')
stopwords.add('emoji1f633')
stopwords.add('emoji2747')
stopwords.add('emoji2764')
stopwords.add('emoji1f4b5')
stopwords.add('emoji1f497')
stopwords.add('u200b')
stopwords.add("u200b'")
#导入背景图
bg_image = plt.imread('bg.jpg')
# 设置词云参数,参数分别表示:画布宽高、背景颜色、背景图形状、字体、屏蔽词、最大词的字体大小
wc = WordCloud(width=1024,height=768,background_color='white', mask=bg_image, font_path='simkai.ttf',
stopwords=stopwords, max_font_size=400, random_state=50)
#simkai.ttf是系统的简体字体文件 在C:\Windows\Fonts目录下有
#将分词后的数据传入云图
wc.generate_from_text(words)
plt.imshow(wc) #绘制图像
plt.axis('off') #不显示坐标轴
#保存生成的图片
wc.to_file('个性签名云图.jpg')
wc.generate_from_text(words1)
plt.imshow(wc)
plt.axis('off')
wc.to_file('备注名云图.jpg')
安装对应需要的库和把字体文件复制到当前目录下 即可
命令行输入:python cloud_img.py 两张图片就出来了
接下来就是最精彩的部分了
头像分析和头像拼接
直接上效果图:

接下来就是准备部分了
需要用到腾讯优图的人脸识别,习惯性的用python中的
pip install TencentYoutuyun 结果失败了
正确方法:下载sdk文件:https://github.com/Tencent-YouTu/Python_sdk
打开下载目录 运行cmd 命令行输入pip install Python_sdk-master.zip
然后要到腾讯忧图(https://open.youtu.qq.com/)申请公有云服务 (我是一天内就申请到了,就说是运用python-itchat的获取头像后 比对头像是否是真人头像的一次测试)
然后我们申请成功后就会有AppID SecretID SecreKey 三个参数。
接着我们就创建head_portrait.py
代码如下:1
2
3
4
5
6
7
8
9
10
11
12
13
14
15
16
17
18
19
20
21
22
23
24
25
26
27
28
29
30
31
32
33
34
35
36
37
38
39
40
41
42
43
44
45
46
47
48
49
50
51
52
53
54
55
56
57
58
59
60
61
62
63
64
65
66
67
68
69
70
71
72
73
74
75
76
77
78
79
80
81
82
83
84
85
86
87
88
89
90
91
92
93
94
95
96
97
98
99
100
101
102
103
104
105
106
107
108
109
110
111
112# -*- coding:utf-8 -*-
#author:云亦然
#头像分析、拼接
#自行安装PIL和math(pip install Pillow)
import itchat
import os
import TencentYoutuyun
from pyecharts import Pie
from math import sqrt
from PIL import Image
# 获取微信好友头像
def get_head_image():
a = 0
itchat.auto_login()
friends = itchat.get_friends(update=True)
# 在当前位置创建一个存储头像的目录
save_path = "head_images"
if not os.path.exists(save_path):
os.mkdir(save_path)
#获取所以好友的头像,保存到本地
for friend in friends:
head = itchat.get_head_img(userName=friend['UserName'])
img_name = friend['RemarkName']
img_name = img_name.replace('"','')#把特殊符号"替换掉
img_name = img_name.replace('.','')#把特殊符号.替换掉
img_file = open(save_path + '/'+ img_name + '.jpg','wb')
a+=1
img_file.write(head)
img_file.close()
print(a)#输出遍历好友次数
def analyse_data():
appid = '*****'
secret_id = '*****'
secret_key = '******'
userid = '531845432'
end_point = TencentYoutuyun.conf.API_YOUTU_END_POINT # 优图开放平台
youtu = TencentYoutuyun.YouTu(appid, secret_id, secret_key, userid, end_point)
use_face = 0
not_use_face = 0
save_path = "head_images"
for file_name in os.listdir(save_path):
result = youtu.DetectFace(os.path.join(save_path, file_name)) # 人脸检测与分析
# print(result) # 参考 https://open.youtu.qq.com/legency/#/develop/api-face-analysis-detect
# 判断是否使用人像
if result['errorcode'] == 0: # errorcode为0表示图片中存在人像
use_face += 1
gender = '男' if result['face'][0]['gender'] >= 50 else '女'
age = result['face'][0]['age']
beauty = result['face'][0]['beauty'] # 魅力值
glasses = '不戴眼镜 ' if result['face'][0]['glasses'] == 0 else '戴眼镜'
# print(file_name[:-4], gender, age, beauty, glasses, sep=',')
with open('header.txt', mode='a', encoding='utf-8') as f:
f.write('%s,%s,%d,%d,%s\n' % (file_name[:-4], gender, age, beauty, glasses))
else:
not_use_face += 1
attr = ['使用人脸头像', '未使用人脸头像']
value = [use_face, not_use_face]
pie = Pie('好友头像分析', '', title_pos='center')
pie.add('', attr, value, radius=[30, 75], is_label_show=True,is_legend_show=True, legend_top='bottom')
# pie.show_config()
pie.render('好友头像分析.html')
#拼接头像
def spliced_head(save_path):
path_list = []
for item in os.listdir(save_path):
img_path = os.path.join(save_path,item)
path_list.append(img_path)
line = int(sqrt(len(path_list)))
New_Image = Image.new('RGB',(128 * line,128 * line))
x,y = 0,0
for item in path_list:
try:
img = Image.open(item)
img = img.resize((128,128),Image.ANTIALIAS)
New_Image.paste(img,(x * 128,y * 128))
x+=1
print(x)#查看拼接进度
except IOError:
print("第%d行,%d列文件读取失败!IOError:%s"%(y,x,item))
if x == line:
x = 0
y+=1
if(x + line * y) == line * line:
break
New_Image.save('Avatarcollection.jpg')
itchat.send_file('Avatarcollection.jpg', toUserName='filehelper')#发送头像合集到文件传输助手
if __name__ == '__main__':
get_head_image()
analyse_data()
spliced_head("head_images")
然后如果联系人比较多的话 拼接是需要点时间的
微信好友大曝光到此结束!
github:https://github.com/JaneBraun/Python-itchat
Author: 云亦然
Link: http://JaneBraun.github.io/2019/03/04/Python-itchat之微信好友大曝光/
Copyright: All articles in this blog are licensed under CC BY-NC-SA 3.0 unless stating additionally.